Traverse (R3TRAV)
Command: R3TRAV
Enters a survey traverse interactively into the drawing. Each leg is defined by a bearing and a distance. Lines and arcs are drawn into the current layer as you type.
This is a data entry tool for cadastral survey plans — not a network adjustment program. The goal is speed and accuracy when entering traverse data from paper records.
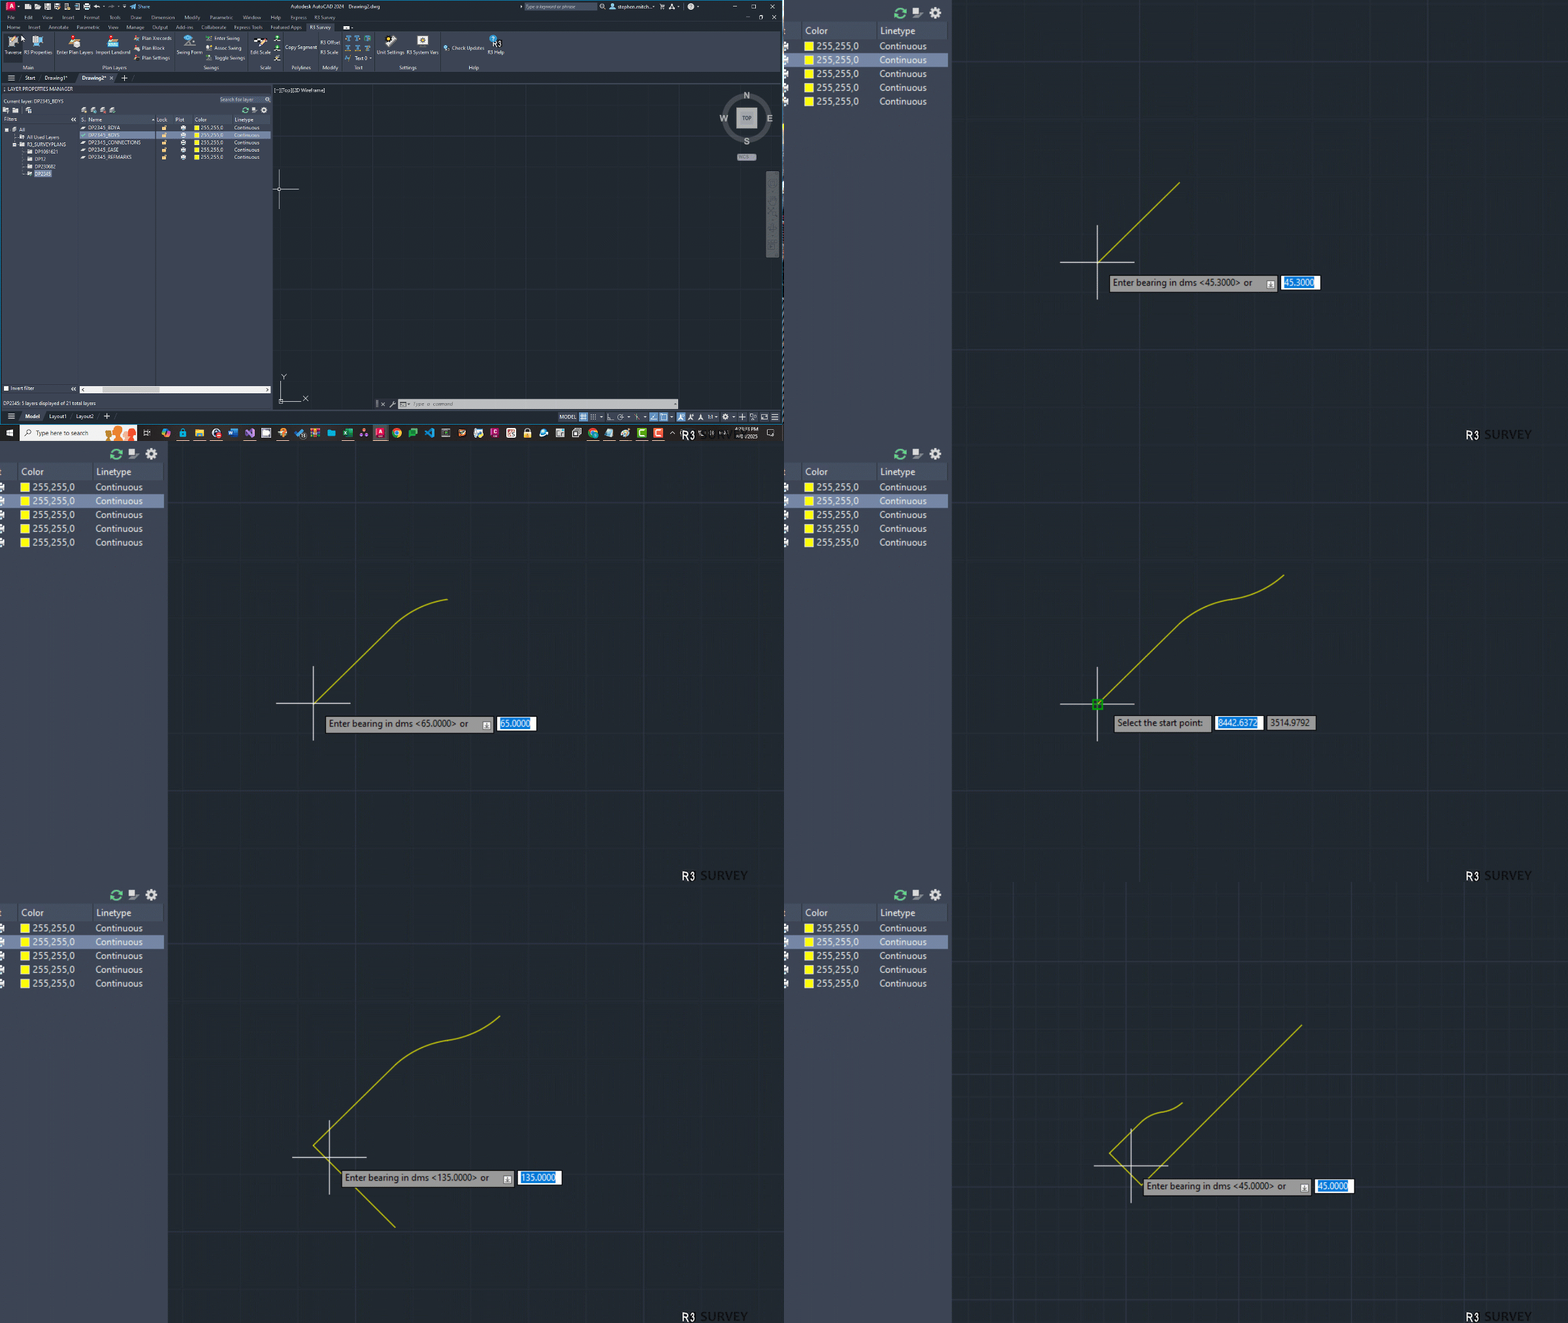
Starting the command
Type R3TRAV at the command line or click the Traverse button in the R3Survey ribbon.
Swing warning
If a swing is active in the current drawing, R3TRAV will warn you before starting. All bearings you enter will be adjusted by the current swing. See Swings.
Step 1 — Pick a start point
Click a point in the drawing or type coordinates (Easting, Northing). The traverse begins at this point.
Step 2 — Enter bearing
Enter bearing <last>:
Type the bearing for the next leg. Press Enter to repeat the previous bearing.
Bearing formats
R3TRAV accepts three bearing systems. The active system is set in R3UNITS (Angles tab).
Decimal DMS (North Azimuths)
Whole-circle bearings measured clockwise from north. Degrees, minutes, and seconds are written together as a single number:
| What you type | Means |
|---|---|
129.2535 |
129° 25' 35" |
315.30457 |
315° 30' 45.7" |
125.30 |
125° 30' 00" (trailing zero required — 125.3 is invalid) |
315 |
315° 00' 00" |
0 |
0° 00' 00" (360 is invalid) |
Minutes and seconds
Minutes and seconds must be in the range 0–59. 45.6100 (61 minutes) is rejected. When entering minutes without seconds, the trailing zero is required — 125.30 is valid, 125.3 is not.
Surveyor's Bearings (Quadrantal)
Bearings entered as a quadrant number followed by the angle from the cardinal point:
| Quadrant | Direction | Example input | Means |
|---|---|---|---|
1 |
North-East | 129.3020 |
N 29° 30' 20" E |
2 |
South-East | 210.30 |
S 10° 30' 00" E |
3 |
South-West | 310.30 |
S 10° 30' 00" W |
4 |
North-West | 410.30 |
N 10° 30' 00" W |
Cardinal and intermediate directions can also be typed directly:
| Type | Means |
|---|---|
N |
North (0°) |
E |
East (90°) |
S |
South (180°) |
W |
West (270°) |
NE |
45° |
SE, SW, NW |
135°, 225°, 315° |
Gradians (Gons)
Enter the gradian value as a plain decimal number. Gradians divide a full circle into 400 increments:
Enter bearing in gradians: 210.7184
Picking a bearing from the drawing
Type P at the bearing prompt, then select a line, arc, or polyline segment. R3TRAV displays the computed bearing and asks you to confirm:
Accept this bearing: 340.3752? [Reverse/No] <Yes>:
- Press Enter to accept
- Type
Rto reverse the bearing (flips direction 180°) - Type
Nto discard and re-enter
For polylines, the segment closest to your pick point is used.
Special bearing inputs
| Input | Action |
|---|---|
| Enter | Repeat the previous leg's bearing |
q |
Quit — finish the traverse and keep all legs drawn so far |
| Esc | Exit without completing the current leg |
+45.3020 |
Enter a radiation (forward side shot) — see Radiations |
-45.3020 |
Enter a reversed radiation — see Radiations |
b, a, r, i, c, t, o |
Change layer — see Layer changes |
Step 3 — Enter distance
Enter distance in metres <last>:
Type the distance for this leg. Press Enter to repeat the previous distance.
Switching units mid-traverse
You can switch input units at any distance prompt without leaving the command:
| Type | Switches to |
|---|---|
m |
Metres |
f |
Feet and inches |
e |
Decimal feet |
u |
US survey feet |
l |
Links |
? |
Show keyword help in the command line |
The unit switch takes effect immediately and persists for subsequent legs.
Adding distances
Use + to sum distances on the fly:
Enter distance in metres: 10.5+3.25
This enters a leg of 13.75 m. Works with feet and inches too.
Multiple legs at the same bearing
Use , to enter several legs at the current bearing without returning to the bearing prompt:
Enter distance in metres: 10,20,15
This creates three consecutive legs of 10, 20, and 15 units — all at the same bearing.
Repeated segments
Use * to repeat the same length multiple times:
Enter distance in metres: 40*5
This creates five legs of 40 units each at the same bearing.
Entering an arc leg
Type c at the distance prompt to enter an arc leg (chord-radius method):
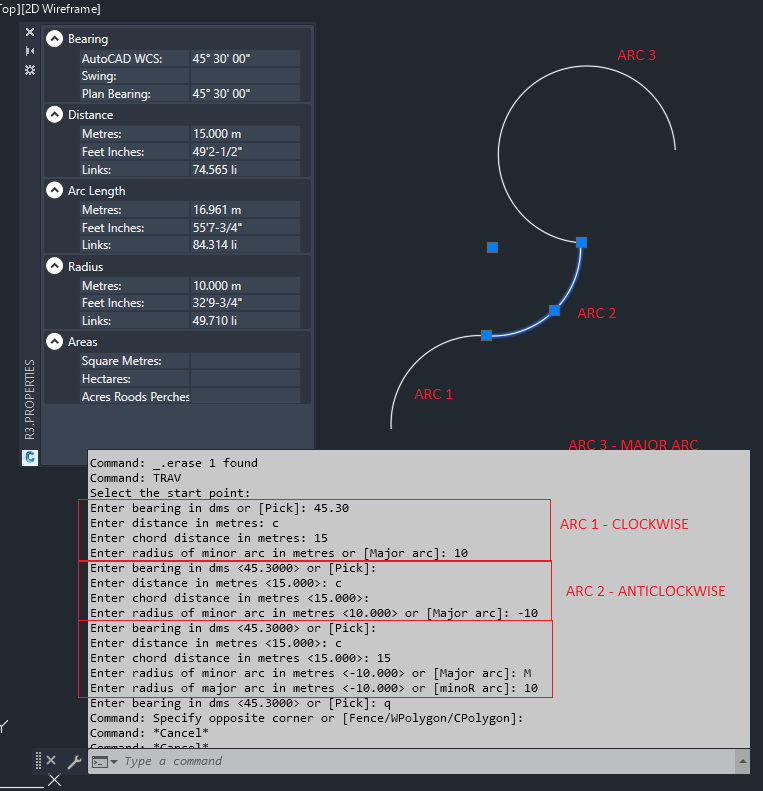
Enter distance in metres: c
Enter chord distance in metres <last>:
Then enter the chord length, followed by the radius:
Enter radius of minor arc in metres or [Major arc]:
- Positive radius — arc curves to the right (clockwise, facing along the chord)
- Negative radius — arc curves to the left (counterclockwise)
The default is a minor arc (central angle < 180°). To enter a major arc, type M at the radius prompt. Type R to switch back to minor arc.
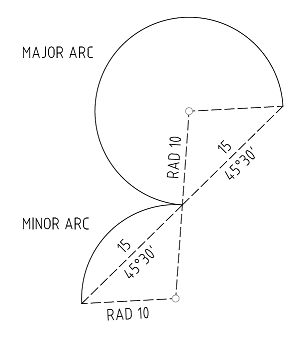
| Type at radius prompt | Effect |
|---|---|
| A number | Enter the radius and draw the arc |
M |
Switch to major arc mode |
R |
Switch back to minor arc mode |
AutoCAD arc direction
When you enter a clockwise arc from Point 1 to Point 2, AutoCAD stores it internally as a counterclockwise arc from Point 2 to Point 1. This is normal AutoCAD behaviour and does not affect the drawn geometry.
Radiations (side shots)
Prefix a bearing with + or - to enter a radiation — a side shot that branches from the current traverse point without advancing the main traverse.
Forward radiation (+) — draws the line in the direction of the entered bearing:
Enter bearing: +135.0000
Enter distance in metres: 15.5
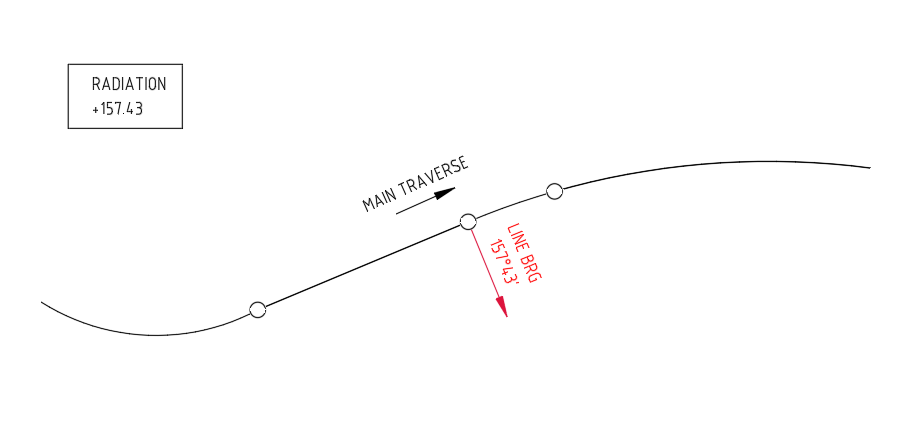
Reversed radiation (-) — computes the same point but stores the line in the opposite direction (geometry runs from the computed point back to the current station):
Enter bearing: -157.4300
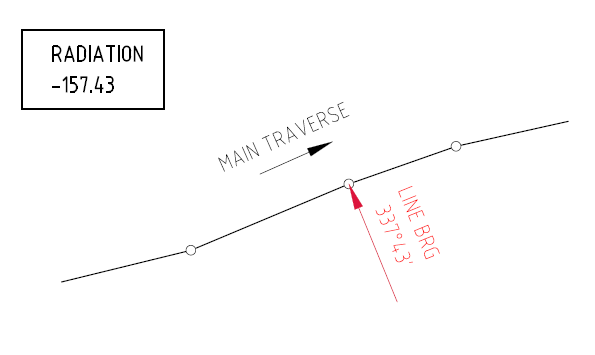
This is useful when the CAD line needs to point toward the current station rather than away from it.
After a radiation is drawn, the next bearing prompt returns to the current traverse end point — the traverse continues as if the radiation was never entered.
Radiations can be combined with layer change prefixes:
Enter bearing: +r45.3035
This fires a radiation on the Reference Marks layer, bearing 45° 30' 35".
Layer change options
While in the traverse command, type one of the recognised layer prefixes at the bearing prompt to instantly switch to the corresponding component layer of the current survey plan.
Survey plan layers required
Layer change shortcuts only work when layers have been created by R3Survey using R3PL or R3PLANLAYERSETTINGS. See Survey Plans.
| Prefix | Layer component | Description |
|---|---|---|
b |
Boundaries | Property boundary lines |
a |
Adjoining Boundaries | Adjoining property boundaries |
r |
Reference Marks | Reference marks and control points |
i |
Easements & Interests | Easements and interests |
c |
Control | Control traverse lines |
o |
Connections | Connection lines |
Enter the prefix alone to change layer, or combine it with a bearing to change layer and start that leg in one step:
Enter bearing: b           ← change to Boundaries layer, then enter bearing
Enter bearing: b45.3035    ← change to Boundaries layer and set bearing 45°30'35"
Finishing the traverse
- Type
qat any bearing prompt to finish cleanly - Press Esc to exit immediately
- Press Enter at the bearing prompt when there is no previous bearing to exit
Notes
- All legs are drawn on the current layer at the time of entry. Set your layer before running
R3TRAV, or use layer change prefixes during entry. - If a swing is active, entered bearings are automatically adjusted before drawing. The adjusted bearing is used, not the raw entered value.
- Type
?at any prompt to list available options.